

It was a rainy Sunday afternoon when I first attempted to recreate the magic of a Parisian patisserie in my kitchen. I’d just returned from a trip to France where every morning began with flaky pastries and every evening ended with decadent desserts. Back home, as I stared at my countertop covered in flour and failed attempts at croissants, I nearly gave up on my French dessert dreams entirely.
That is, until I discovered that many classic French desserts are actually much more approachable than they appear. With some patience, the right techniques, and a few insider tips, these seemingly intimidating treats can become part of your regular baking repertoire. The best part? Many of them work beautifully in modern appliances like air fryers, which provide the consistent heat that French baking often requires.
So put on your apron and let’s bring a bit of Paris into your kitchen with these 10 classic French desserts that are entirely possible to make at home!
1. Crème Brûlée: The Deceptively Simple Showstopper
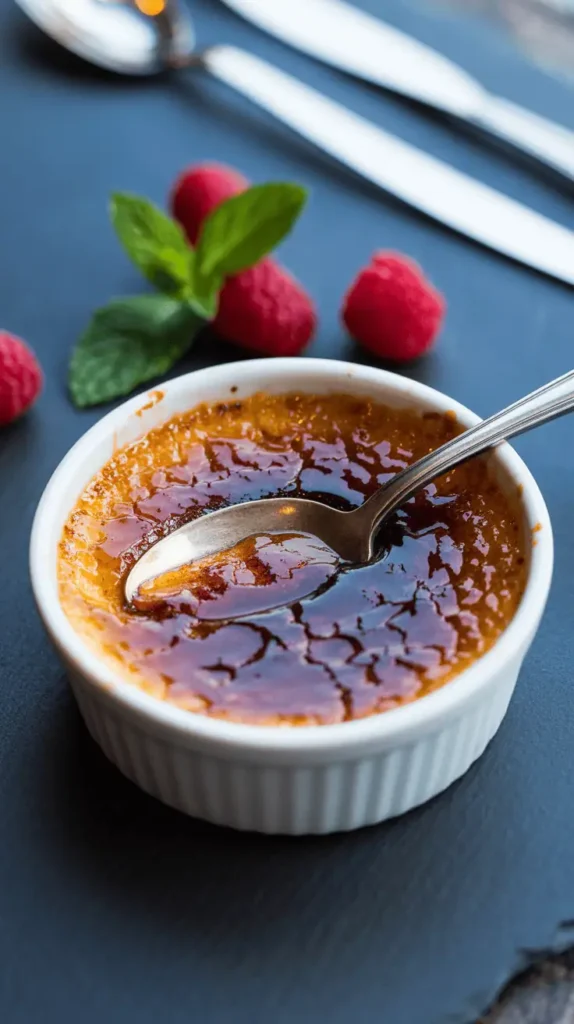
There’s something magical about breaking through that glassy caramelized sugar top to reach the silky custard beneath. Despite its elegant restaurant presentation, crème brûlée is essentially just a baked custard with a caramelized sugar crust.
The secret to perfect crème brûlée is in the gentle cooking. Traditional recipes call for a water bath in the oven, but I’ve found that an air fryer set to a low temperature (around 300°F) creates the perfect gentle heat environment without the fuss of a water bath.
Whisk together 2 cups heavy cream, 5 egg yolks, 1/2 cup sugar, and 1 teaspoon vanilla extract. Pour into ramekins and air fry at 300°F for about 20 minutes until the edges are set but the center still has a slight jiggle. After chilling for at least 4 hours, sprinkle with sugar and use a kitchen torch to create that signature crackling top.
Common Mistake: Overcooking the custard. When it’s done, it should still have a slight wobble in the center—it will continue to set as it cools. If it’s completely firm when you remove it from the heat, you’ll end up with sweet scrambled eggs rather than silky custard.
Get the Complete Crème Brûlée Recipe →
2. Tarte Tatin: The “Mistake” That Became a Classic
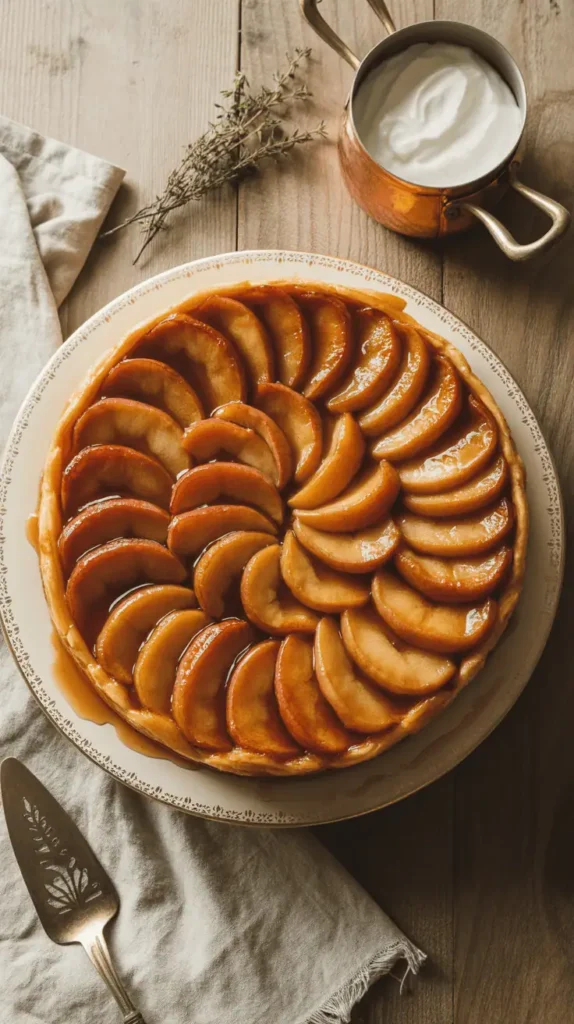
I love telling the origin story of this dessert to my skeptical baking friends. Legend has it that the Tatin sisters accidentally baked an apple tart upside down, and in trying to save it, created a masterpiece. There’s something encouraging about knowing that even kitchen disasters can become classics!
What makes tarte tatin special is the caramelization of the apples before the pastry even enters the picture. This creates a depth of flavor that’s impossible to achieve with a standard apple pie.
In an oven-safe skillet, melt 6 tablespoons butter with 3/4 cup sugar until it forms a light caramel. Arrange 6-7 peeled, quartered apples (Granny Smith or Honeycrisp work well) in the caramel, rounded side down. Cook for 15-20 minutes until the apples soften and absorb the caramel. Top with a round of puff pastry, tucking the edges down into the pan. Bake at 375°F for 25-30 minutes until golden brown, then carefully invert onto a serving plate.
Personal Note: After many failed flips that resulted in apple pieces scattered across my counter, I’ve learned to let the tarte cool for exactly 10 minutes before attempting to invert it—not so hot that the caramel runs everywhere, but not so cool that it sticks to the pan.
Get the Complete Tarte Tatin Recipe →
3. Macarons: The Colorful Challenge Worth Mastering
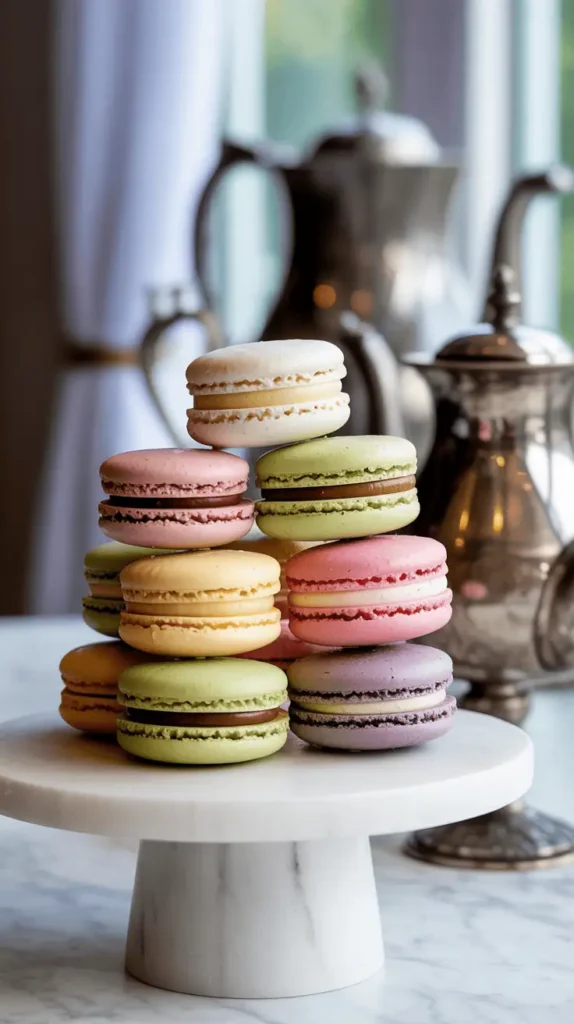
My first attempt at macarons looked more like flat, cracked cookies than the domed, footed beauties displayed in French patisseries. Twelve batches later (yes, really), I finally understood the technique, and now I’m sharing the lessons I learned the hard way.
Macarons have a reputation for being temperamental, and while they do require precision, understanding the science behind them makes success much more likely. The key is in properly folding the almond mixture (macaronage) and allowing the shells to form a skin before baking.
Sift 1 cup almond flour with 1¾ cups powdered sugar. Separately, whip 3 egg whites with a pinch of salt until foamy, then gradually add ¼ cup granulated sugar until stiff peaks form. Gently fold the dry ingredients into the egg whites until the batter flows like lava. Pipe onto parchment-lined baking sheets and let sit for 30-45 minutes until a skin forms. Bake at 300°F for 15-17 minutes.
Expert Tip: Age your egg whites! Separate them 24-48 hours before baking and leave them covered in the refrigerator. This reduces moisture and strengthens the protein structure, resulting in more stable meringue. Also, use a kitchen scale—macarons are all about precise measurements.
Get the Complete Macarons Recipe →
4. Clafoutis: The Rustic Cherry Delight
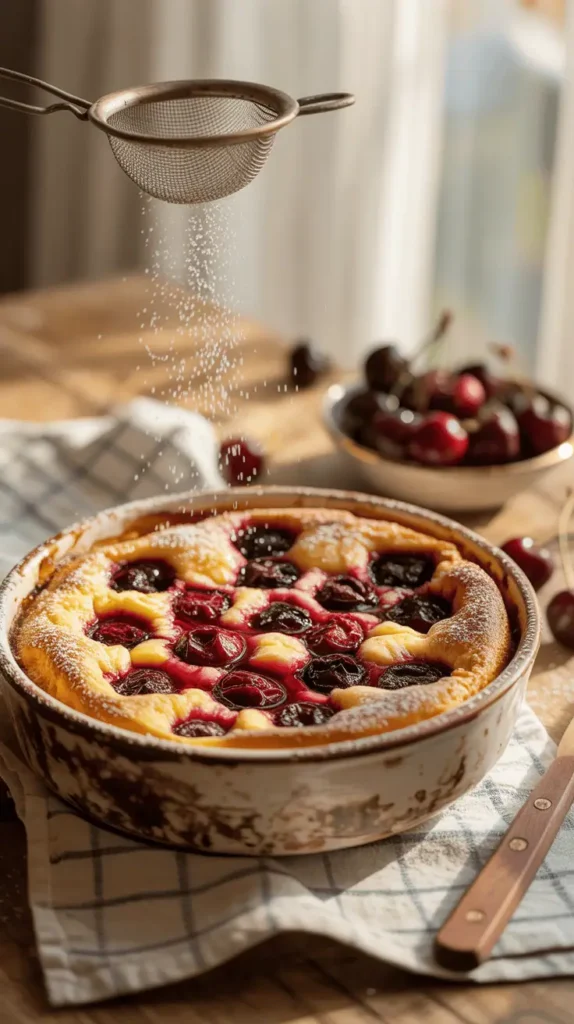
When cherry season arrives, clafoutis becomes my go-to dessert for impromptu dinner parties. This rustic dish falls somewhere between a pancake, custard, and cake, and it comes together in minutes.
Traditionally made with unpitted cherries (the pits supposedly add almond flavor), modern versions often use pitted cherries for convenience. The batter puffs dramatically in the oven, then settles as it cools, creating a custard-like texture studded with fruit.
Butter a baking dish and fill with 2 cups pitted cherries. Blend 3 eggs, 1 cup milk, ½ cup flour, ⅓ cup sugar, 1 tablespoon melted butter, and 1 teaspoon vanilla until smooth. Pour over cherries and bake at 350°F for 35-40 minutes until puffed and golden. Dust with powdered sugar before serving.
Common Mistake: Opening the oven door too early. Just like a soufflé, clafoutis needs uninterrupted heat to rise properly. Resist the temptation to peek until at least 30 minutes have passed.
Get the Complete Clafoutis Recipe →
5. Mille-Feuille: The Thousand Layers of Happiness
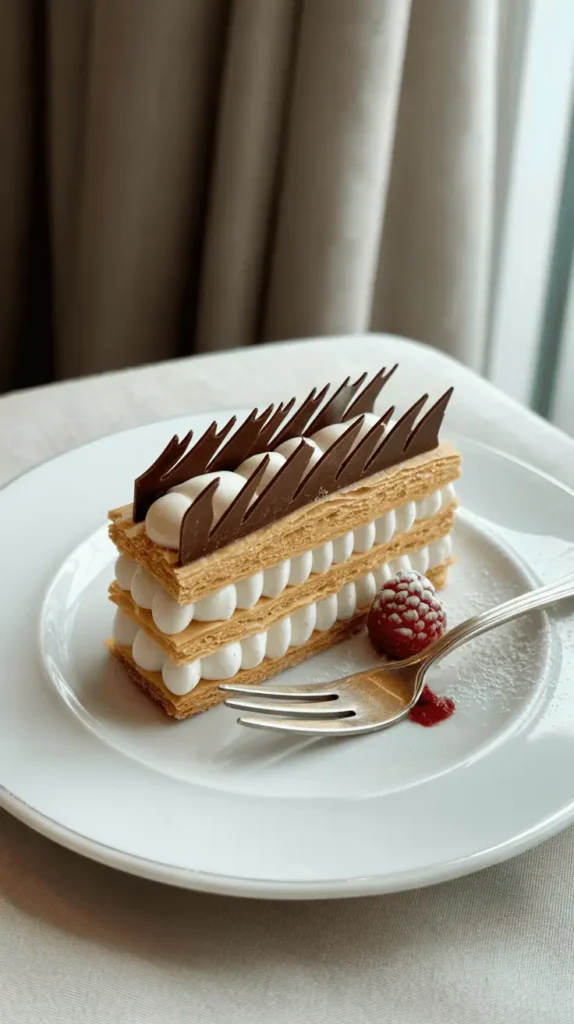
The name means “thousand leaves” in French, referring to the many layers of puff pastry that make up this rectangular treat. While traditional versions have three layers of pastry and two of cream, I’ve found that even a simplified two-layer version makes for an impressive dessert.
The secret to a good mille-feuille isn’t in making puff pastry from scratch (though you certainly can). It’s in baking the store-bought pastry correctly—with something heavy on top to prevent excessive rising—and in the proper chilling time to allow the layers to set.
Roll out puff pastry and cut into rectangles. Place another baking sheet on top to prevent excessive rising and bake at 400°F for 15-20 minutes until golden. For the filling, whip 1 cup heavy cream with 3 tablespoons sugar and 1 teaspoon vanilla. Layer cream between pastry sheets, refrigerate for at least 2 hours before serving.
Personal Note: I keep a clean brick wrapped in foil specifically for weighing down pastry—it works better than another baking sheet alone and ensures perfectly flat, crisp layers.
Get the Complete Mille-Feuille Recipe →
6. Éclairs: The Elongated Elegance

My grandmother always said you could judge a patisserie by its éclairs. These oblong choux pastry shells filled with pastry cream and topped with chocolate ganache might look complicated, but they’re actually one of the more forgiving French pastries once you understand choux dough.
The magic of choux pastry is in its twice-cooked nature—once on the stovetop and once in the oven. This creates steam that puffs the pastry, leaving a hollow center perfect for filling.
In a saucepan, bring 1 cup water, ½ cup butter, and a pinch of salt to a boil. Add 1 cup flour all at once and stir vigorously until a smooth ball forms. Let cool slightly, then beat in 4 eggs, one at a time. Pipe 4-inch lines onto a parchment-lined baking sheet and bake at 400°F for 25-30 minutes until golden and dry. Fill with vanilla pastry cream and top with chocolate ganache.
Expert Tip: After baking, poke a small hole in the end of each éclair to release steam, which prevents sogginess. And never, ever open the oven during the first 20 minutes of baking or your éclairs will collapse!
Get the Complete Éclairs Recipe →
7. Financiers: The Buttery Elegance in Simplicity
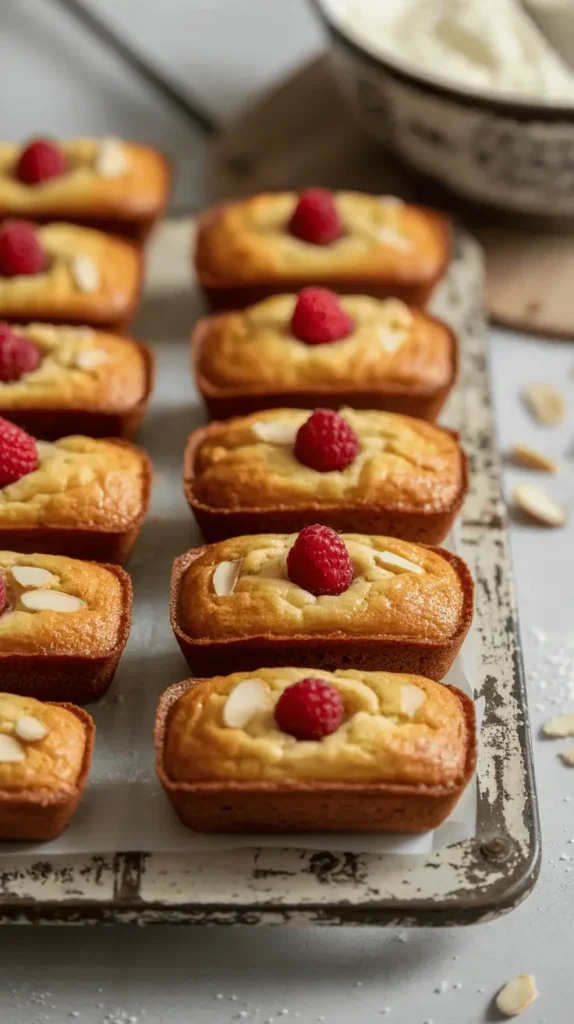
Named for their traditional rectangular shape resembling gold bars (they were popular in the financial district of Paris), financiers are simple almond cakes with a crisp exterior and moist interior. Their secret ingredient? Beurre noisette, or brown butter, which gives them their distinctive nutty flavor.
What makes financiers special is their texture contrast—crisp edges giving way to a tender center—and their ability to take on various flavor additions like berries, citrus zest, or spices.
Brown ½ cup butter until it smells nutty. Mix 1 cup almond flour, ¾ cup powdered sugar, and ¼ cup flour. Fold in 4 lightly beaten egg whites and the brown butter. Divide among mini muffin tins and bake at 375°F for 12-15 minutes until the edges are golden but the centers remain moist.
Common Mistake: Using cold ingredients. Everything should be at room temperature to achieve the proper batter consistency. I learned this the hard way after wondering why my first batch turned out dense and flat rather than light and crisp-edged.
Get the Complete Financiers Recipe →
8. Madeleines: The Seashell-Shaped Memory Makers

Marcel Proust immortalized these little cakes in literature, and their distinctive seashell shape makes them instantly recognizable. What many don’t realize is that authentic madeleines have a signature hump on their backs—a sign of proper preparation.
The secret to achieving this hump is chilling the batter for at least an hour before baking. This allows the flour to hydrate fully and creates the temperature contrast needed for the dramatic rise.
Melt ½ cup butter and let cool. Beat 2 eggs with ⅔ cup sugar until pale and thick. Fold in 1 cup flour, 1 teaspoon baking powder, and butter. Add 1 tablespoon lemon zest. Refrigerate batter for at least 1 hour. Fill madeleine molds ¾ full and bake at 375°F for 10-12 minutes until the edges are golden and centers spring back when touched.
Personal Note: I once forgot to chill the batter and ended up with flat, dense cookies instead of light, humped madeleines. Now I make the batter the night before for breakfast madeleines—the extended chill time actually improves the flavor and texture.
Get the Complete Madelaines Recipe →
9. Canelés: The Caramelized Cylinders of Bordeaux
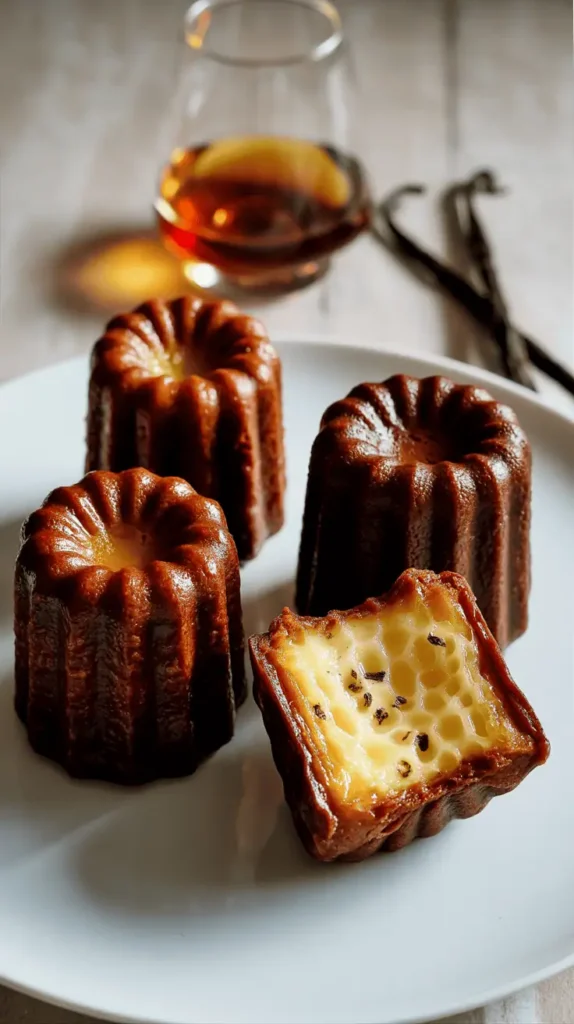
After visiting Bordeaux years ago, I became obsessed with recreating these uniquely textured pastries at home. With their dark, caramelized crust and custardy center perfumed with rum and vanilla, canelés are unlike any other French dessert.
Traditional canelés are baked in copper molds lined with beeswax, but silicone molds produce excellent results for home bakers. The contrast between the almost-burnt exterior and the soft, vanilla-scented interior is what makes these treats special.
Warm 2 cups milk with 2 tablespoons butter until hot but not boiling. Whisk 2 eggs with 1 cup sugar, then add 1 cup flour. Slowly pour in the warm milk mixture, then add 2 tablespoons dark rum and 1 tablespoon vanilla extract. Refrigerate batter for 24-48 hours (this is essential!). Fill canelé molds ¾ full and bake at 450°F for 15 minutes, then reduce to 350°F and bake for another 45-60 minutes until deeply caramelized.
Expert Tip: The long resting time for the batter isn’t optional—it allows the flour to fully hydrate and the air bubbles to dissipate, resulting in that distinctive custardy interior. I’ve tried shortcuts, and they simply don’t work.
Get the Complete Canelés Recipe →
10. Opera Cake: The Harmonious Layers of Coffee and Chocolate
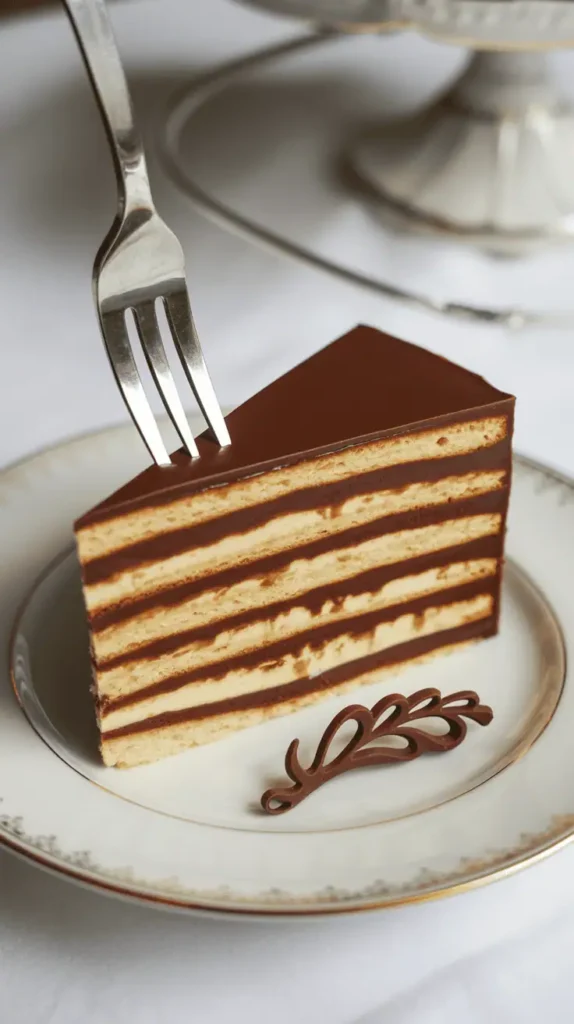
The first time I saw an Opera cake, with its perfectly even layers of almond sponge, coffee buttercream, and chocolate ganache, I assumed it required professional pastry chef skills. While it is more involved than other desserts on this list, breaking it down into components makes it entirely manageable.
Named after the Paris Opera house, this cake’s precision mirrors the discipline of ballet. The key is in preparing each element separately and assembling with patience.
Make a thin almond sponge cake (joconde): Beat 6 egg whites until stiff, separately beat 6 egg yolks with 1 cup powdered sugar, fold in 1 cup almond flour and ¼ cup regular flour, then fold in the whites. Bake in thin layers at 425°F for 5-7 minutes. For coffee buttercream: Beat 1 cup butter with 2 cups powdered sugar, then add 2 tablespoons strong coffee. For ganache: Heat ½ cup cream, pour over 4 oz chopped chocolate. Assemble by alternating layers of cake brushed with coffee syrup, buttercream, and ganache. Chill thoroughly before cutting.
Common Mistake: Rushing the assembly. Each layer needs time to set properly in the refrigerator before adding the next, or you’ll end up with a sliding, messy stack instead of clean, defined layers. I set aside a full afternoon for making this cake and consider it a meditative process.
Get the Complete Opera Cake Recipe →
Pro Tips for French Dessert Success
- Mise en place is non-negotiable: Having all ingredients measured and ready before starting is crucial for French baking.
- Invest in a kitchen scale: French recipes traditionally use weight measurements for precision, and converting to volume can affect results.
- Temperature matters: Ingredients like butter and eggs should generally be at room temperature unless specified otherwise.
- Don’t fear the classics: Many French techniques seem intimidating but are actually straightforward once you understand the principles behind them.
- Practice patience: Many French desserts require resting, chilling, or cooling periods that shouldn’t be rushed.
What You’ll Love Next
If you’ve enjoyed these classic French desserts, you’ll want to explore our “French-Inspired Air Fryer Pastries” collection, where we adapt traditional techniques for modern convenience. Or try our “5-Ingredient French Sweets” for simplified versions of complex classics.
Pin It for Later!
Found this guide inspiring? Pin it to your Baking or French Cuisine boards on Pinterest so you can revisit these recipes when you’re ready to channel your inner pâtissier! Don’t forget to tag @Dessertique in your creations—we love seeing your French baking adventures come to life!


